本文共 11154 字,大约阅读时间需要 37 分钟。
本文主要是自己在学习Netty入门的文档的时候写下的笔记。主要是用于入门的,其中的材料全部来自于官方的资料。这套类库用起来还是非常的舒服的。作者也是多年的网络通讯的老司机了,所以对于接口的便利性有一定的考虑。当然如果想知道这个库的全部用法,还是需要自己去在实践过程中阅读API手册,慢慢发现他的强大和体贴。用java来写服务器就是让强大的程序进驻到你的服务器体系中,而你只需要关心自己的逻辑上的发挥,这也是Java被带到世界的初衷。这样说有些程序就有些不服气。其实没有啥不服气的,人家优秀就用好了。而且大部分人都没有人家写出来的东西周到。
基础概念
Netty是一个异步事件驱动网络程序框架。
Netty是一个NIO客户端服务器框架,可以快速、简单的开发网络应用,例如自定义协议服务器和客户端。它简化了TCP/UP socket服务器网络编程。 ‘Quick and easy’不代表最终程序将会遭遇维护或性能问题。Netty吸收了之前的协议实现类似FTP,SMTP,HTTP和各种binary和基于文本类似经验,并且很小心的设计过。结果Netty已经成功的找到一个方法去开发一个高效、稳固、具有弹性的服务器。特性
设计
1.为多种传输类型(阻塞、非阻塞socket)统一API;
2.基于一个灵活和可扩展的事件模型,允许清晰的分工; 3.高度可定制化线程模型; 4.真正无连接数据报socket支持(自从3.1)易于使用
1.良好的JavaDoc,用户指南和实例;
2.不需要多余的依赖,JDK5(Netty3.x)或者6(Netty4.x)足以。(注:有些组件例如HTTP/2可能更多的需求库,具体请性能
1.更高的吞吐量,低延时;
2.低资源消耗; 3.最少的内存拷贝次数;安全性
1.完全支持SSL/TLS和StartTLS
社区
1.提早发布,经常发布;
2.作者自从2003年已经编写过类似的框架,而且他还珍视所有社区的反馈。框架图
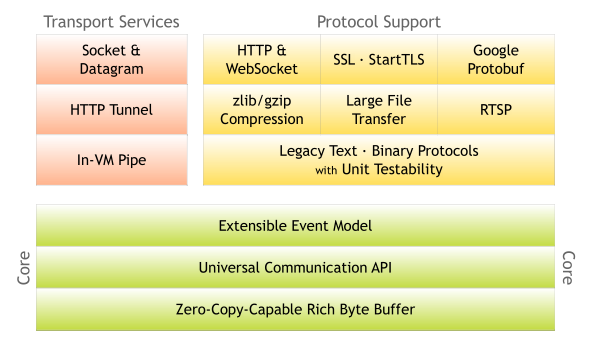
用户指南4.x
编写Discard Server
说白了就是收到任何的数据包都不需要做处理,直接丢弃并且无任何的返回数据。
package io.netty.example.discard;import io.netty.buffer.ByteBuf;import io.netty.channel.ChannelHandlerContext;import io.netty.channel.ChannelInboundHandlerAdapter;/** * Handles a server-side channel. */public class DiscardServerHandler extends ChannelInboundHandlerAdapter { // (1) @Override public void channelRead(ChannelHandlerContext ctx, Object msg) { // (2) // Discard the received data silently. ((ByteBuf) msg).release(); // (3) } @Override public void exceptionCaught(ChannelHandlerContext ctx, Throwable cause) { // (4) // Close the connection when an exception is raised. cause.printStackTrace(); ctx.close(); }} 1.自己的类继承与ChannelInboundHandlerAdapter
2.override channelRead方法,并且将协议直接丢弃; 3.Override exceptionCaught方法当连接断开之后将输出信息。 接下来需要做的就是编写main方法将DiscardServerHandler驱动起来package io.netty.example.discard;import io.netty.bootstrap.ServerBootstrap;import io.netty.channel.ChannelFuture;import io.netty.channel.ChannelInitializer;import io.netty.channel.ChannelOption;import io.netty.channel.EventLoopGroup;import io.netty.channel.nio.NioEventLoopGroup;import io.netty.channel.socket.SocketChannel;import io.netty.channel.socket.nio.NioServerSocketChannel;/** * Discards any incoming data. */public class DiscardServer { private int port; public DiscardServer(int port) { this.port = port; } public void run() throws Exception { EventLoopGroup bossGroup = new NioEventLoopGroup(); // (1) EventLoopGroup workerGroup = new NioEventLoopGroup(); try { ServerBootstrap b = new ServerBootstrap(); // (2) b.group(bossGroup, workerGroup) .channel(NioServerSocketChannel.class) // (3) .childHandler(new ChannelInitializer () { // (4) @Override public void initChannel(SocketChannel ch) throws Exception { ch.pipeline().addLast(new DiscardServerHandler()); } }) .option(ChannelOption.SO_BACKLOG, 128) // (5) .childOption(ChannelOption.SO_KEEPALIVE, true); // (6) // Bind and start to accept incoming connections. ChannelFuture f = b.bind(port).sync(); // (7) // Wait until the server socket is closed. // In this example, this does not happen, but you can do that to gracefully // shut down your server. f.channel().closeFuture().sync(); } finally { workerGroup.shutdownGracefully(); bossGroup.shutdownGracefully(); } } public static void main(String[] args) throws Exception { int port; if (args.length > 0) { port = Integer.parseInt(args[0]); } else { port = 8080; } new DiscardServer(port).run(); }} 1.NioEventLooopGroup是一个多线程事件循环,他将处理I/O。Netty提供多种EventLoopGroup实现提供给不同种类的传输( EpollEventLoopGroup, LocalEventLoopGroup, MultithreadEventLoopGroup, NioEventLoop, NioEventLoopGroup, OioEventLoopGroup, SingleThreadEventLoop, ThreadPerChannelEventLoop, ThreadPerChannelEventLoopGroup)。bossGroup用于管理accept,workGroup用于管理当连接上来的session的。
2.ServerBootStrap是用于构建服务器。将accept和worker都绑定到bootstrap的group上。 3.绑定NioServerSocketChannel通道。 4.绑定新的socket到达之后的通道的Handler,这里是将其指定给DiscardServerHandler智商。 5.设置accept socket的option,具体设置可以。这个在写C++服务器的时候也能看到这些东西。 6.设置client socket的option,同上的一种模式,只是说设置的参数不一样; 7.开始绑定端口;编写时间服务器
时间服务器具体是使用的当玩家练上来之后,我们将会主动的发送一个int32的unix timestamp的数字给他。当传输完毕之后服务器将主动断开这个连接上来的session。
package io.netty.example.time;public class TimeServerHandler extends ChannelInboundHandlerAdapter { @Override public void channelActive(final ChannelHandlerContext ctx) { // (1) final ByteBuf time = ctx.alloc().buffer(4); // (2) time.writeInt((int) (System.currentTimeMillis() / 1000L + 2208988800L)); final ChannelFuture f = ctx.writeAndFlush(time); // (3) f.addListener(new ChannelFutureListener() { @Override public void operationComplete(ChannelFuture future) { assert f == future; ctx.close(); } }); // (4) } @Override public void exceptionCaught(ChannelHandlerContext ctx, Throwable cause) { cause.printStackTrace(); ctx.close(); }} 还是可以基于之前代码来跑这个用例,只是将DiscardServerHandle更换为TimeServerHandler就可以了。
1.重载channelActive 函数。这个函数是当一个session于服务器建立连接之后将会触发调用的; 2.为发送数据分配4byte(int32)的字节数,在后面将会把时间转换成int;在使用ByteBuf这个类的时候可以注意:order(ByteOrder endianness)Returns a buffer with the specified endianness which shares the whole region, indexes, and marks of this buffer.
可以通过这个来做编码big-endian,small-endian的设置;
3.调用ctx.writeAndFlush方法,;ChannelFuture这个类是用来做异步调用的后处理。这种写法还是比较的屌。他可以绑定一个Listener,ChannelFutureListener对象。只需要在重载的方法operationComplete中编写将这个session关闭掉就好了。下面是ChannelFuture的返回值图:+---------------------------+ | Completed successfully | +---------------------------+ +----> isDone() = true | +--------------------------+ | | isSuccess() = true | | Uncompleted | | +===========================+ +--------------------------+ | | Completed with failure | | isDone() = false | | +---------------------------+ | isSuccess() = false |----+----> isDone() = true | | isCancelled() = false | | | cause() = non-null | | cause() = null | | +===========================+ +--------------------------+ | | Completed by cancellation | | +---------------------------+ +----> isDone() = true | | isCancelled() = true | +---------------------------+
4.在这里通过ChannelFuture的addListener方法编写了一个ChannelFutureListener的匿名实例对象,并且重载了operationComplete方法来关闭掉这个socket。也能写下面的方法来直接关闭掉这个socket
f.addListener(ChannelFutureListener.CLOSE);
测试的时候可以通过unix的rdate命令来测试
$rdate -o-p
编写Time Client
这个程序用于测试上章节将的时间服务器的。直接贴上代码:
package io.netty.example.time;public class TimeClient { public static void main(String[] args) throws Exception { String host = args[0]; int port = Integer.parseInt(args[1]); EventLoopGroup workerGroup = new NioEventLoopGroup(); try { Bootstrap b = new Bootstrap(); // (1) b.group(workerGroup); // (2) b.channel(NioSocketChannel.class); // (3) b.option(ChannelOption.SO_KEEPALIVE, true); // (4) b.handler(new ChannelInitializer () { @Override public void initChannel(SocketChannel ch) throws Exception { ch.pipeline().addLast(new TimeClientHandler()); } }); // Start the client. ChannelFuture f = b.connect(host, port).sync(); // (5) // Wait until the connection is closed. f.channel().closeFuture().sync(); } finally { workerGroup.shutdownGracefully(); } }} 1.创建一个Bootstrap对象,类似ServerBootstrap的,只是说这个bootstrap没有accept的group。
2.将创建的客户端的EventLoopGroup添加到bootstrap中; 3.设置通道为socket方式; 4.设置socket的option,并且将ChannelInitializer绑定到TimeClientHandler这个类上; 5.发起对远程的连接; 接下来就是连接上来之后的处理:package io.netty.example.time;import java.util.Date;public class TimeClientHandler extends ChannelInboundHandlerAdapter { @Override public void channelRead(ChannelHandlerContext ctx, Object msg) { ByteBuf m = (ByteBuf) msg; // (1) try { long currentTimeMillis = (m.readUnsignedInt() - 2208988800L) * 1000L; System.out.println(new Date(currentTimeMillis)); ctx.close(); } finally { m.release(); } } @Override public void exceptionCaught(ChannelHandlerContext ctx, Throwable cause) { cause.printStackTrace(); ctx.close(); }} 看到这个代码又开始眼熟了吧。里面就是重载了channelRead之类的消息,将数据从ByteBuf中读取出一个Unsigned integer32出来。并且将其转换成Date类型将其输出,然后关闭掉socket。
处理基于流式的协议通讯
在TCP流式套接字通讯过程中会有问题数据包存在粘包的问题。
第一个解决方案
package io.netty.example.time;import java.util.Date;public class TimeClientHandler extends ChannelInboundHandlerAdapter { private ByteBuf buf; @Override public void handlerAdded(ChannelHandlerContext ctx) { buf = ctx.alloc().buffer(4); // (1) } @Override public void handlerRemoved(ChannelHandlerContext ctx) { buf.release(); // (1) buf = null; } @Override public void channelRead(ChannelHandlerContext ctx, Object msg) { ByteBuf m = (ByteBuf) msg; buf.writeBytes(m); // (2) m.release(); if (buf.readableBytes() >= 4) { // (3) long currentTimeMillis = (buf.readUnsignedInt() - 2208988800L) * 1000L; System.out.println(new Date(currentTimeMillis)); ctx.close(); } } @Override public void exceptionCaught(ChannelHandlerContext ctx, Throwable cause) { cause.printStackTrace(); ctx.close(); }} 1.一个ChannelHandler有两个函数: handlerAdded() and handlerRemoved().函数。
void handlerAdded(ChannelHandlerContext ctx) throws ExceptionGets called after the ChannelHandler was added to the actual context and it's ready to handle events.void handlerRemoved(ChannelHandlerContext ctx) throws ExceptionGets called after the ChannelHandler was removed from the actual context and it doesn't handle events anymore.
2.所有数据将会被累计到buf中;
3.通过判断数据包的大小,如果太短将不会读取,让他继续接受;如果有长将会读取内容并且输出;第二套方案
尽管第一套方案已经解决了TIME client的问题,这个写法不够干净。想象更多的复杂的协议如有多个于之类的。这个时候可以使用ChannelInboundHandler实现。
package io.netty.example.time;public class TimeDecoder extends ByteToMessageDecoder { // (1) @Override protected void decode(ChannelHandlerContext ctx, ByteBuf in, List 在这里可以编写自己的解析函数,将解析出来的内容全部都放到out.add中。
b.handler(new ChannelInitializer() { @Override public void initChannel(SocketChannel ch) throws Exception { ch.pipeline().addLast(new TimeDecoder(), new TimeClientHandler()); }});
在初始化的时候,将会设置一个通道解析方法,以及定时器的处理。
转载地址:http://jdfmf.baihongyu.com/